- To loop a PowerPoint slideshow, you’ll need to enable looping in the “Set Up Slide Show” menu.
- Once you set your PowerPoint to loop, it’ll start over from the beginning automatically after playing the last slide.
- Visit Business Insider’s Tech Reference library for more stories.
If you’ve designed a Microsoft PowerPoint presentation that’s meant to be viewed repeatedly, such as on a kiosk or in a museum installation, you can adjust the settings in PowerPoint so that your slideshow “loops” instead of ending after one viewing.
Getting a PowerPoint to loop is easy. Read on to find out how, using PowerPoint for both Mac and PC.
Check out the products mentioned in this article:
Microsoft Office (From $149.99 at Best Buy)
Apple Macbook Pro (From $1,299.00 at Apple)
Acer Chromebook 15 (From $179.99 at Walmart)
How to loop a PowerPoint presentation
1. Open the Microsoft PowerPoint presentation that you want to loop.
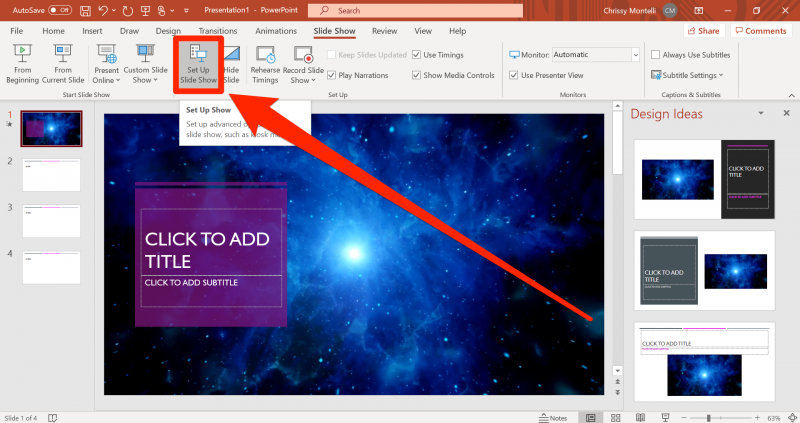
2. With your PowerPoint presentation open, click on the “Slide Show” tab, then click on “Set Up Slide Show.”

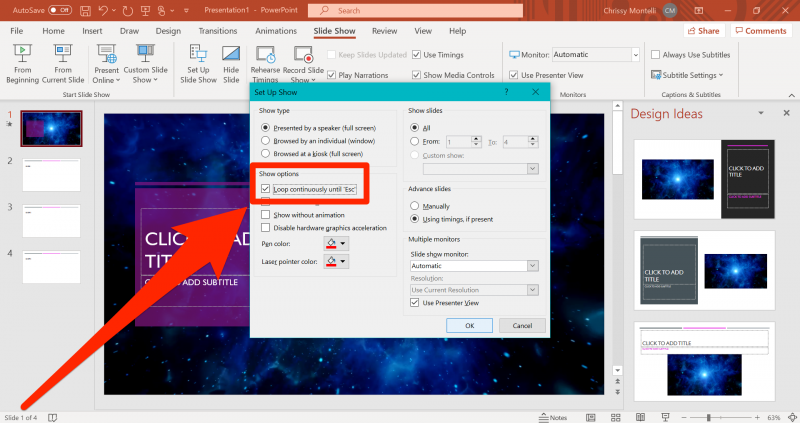
3. In the pop-up window that appears, click on the box next to "Loop continuously until 'Esc'" so that a small checkmark appears inside the box. Feel free to adjust any other settings in this menu as well. Click "OK" when you're finished.

4. To test whether your PowerPoint can loop successfully, click on the "From Beginning" or "Play From Start" button in the Slide Show tab. Click through the slideshow until you reach the end. When your PowerPoint reaches its final slide, it should start over from the beginning automatically. When you're confident that looping is enabled, and you're ready to close the slide show, press the Esc key.
Related coverage from Tech Reference:
-
How to add a border to slides in PowerPoint, and give your slideshow a sleek design
-
How to embed a YouTube video into your Microsoft PowerPoint presentations using a Mac or PC
-
How to convert Google Slides to a PowerPoint presentation in 4 easy steps
-
How to create a custom PowerPoint template to use or share with others
-
How to copy or duplicate a PowerPoint slide and put it anywhere in your slideshow
