- You can forward emails from Outlook by creating a rule that instructs Outlook to automatically forward email to another person or email account, as long as it’s in your Outlook contacts.
- You can set up forwarding using the Rules button in the ribbon bar.
- When you set up a forwarding rule, you can forward all the email arriving in a specific email account, from a specific person, or fine-tune the rule to suit your needs.
- Visit Business Insider’s Tech Reference library for more stories.
There are times when you might want to automatically forward email that’s arriving in Outlook to another account. If you’re going on vacation, for example, it can be convenient to auto-forward messages to a coworker.
Outlook makes forwarding email easy to do, once you know how.
Check out the products mentioned in this article:
Apple Macbook Pro (From $1,299.00 at Apple)
Lenovo IdeaPad 130 (From $469.99 at Walmart)
How to forward emails from Outlook
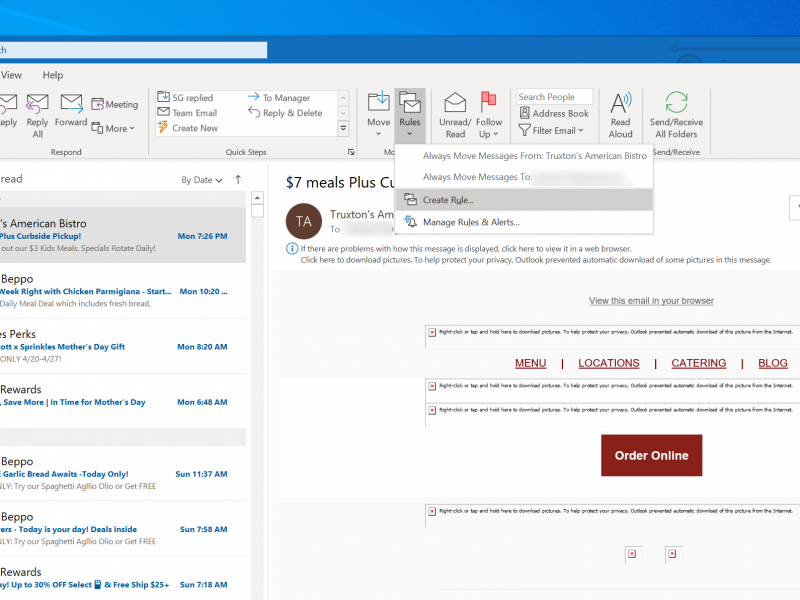
1. In Outlook, make sure you’re in the Mail view. In the ribbon bar, click “Rules,” and then click “Create Rule” in the drop-down menu.

2. The Create Rule dialog box will automatically be ready to create about whatever email is currently selected, but mail forwarding isn't one of the action options, so click "Advanced Options…" in the lower right corner. You should see the Rules Wizard.

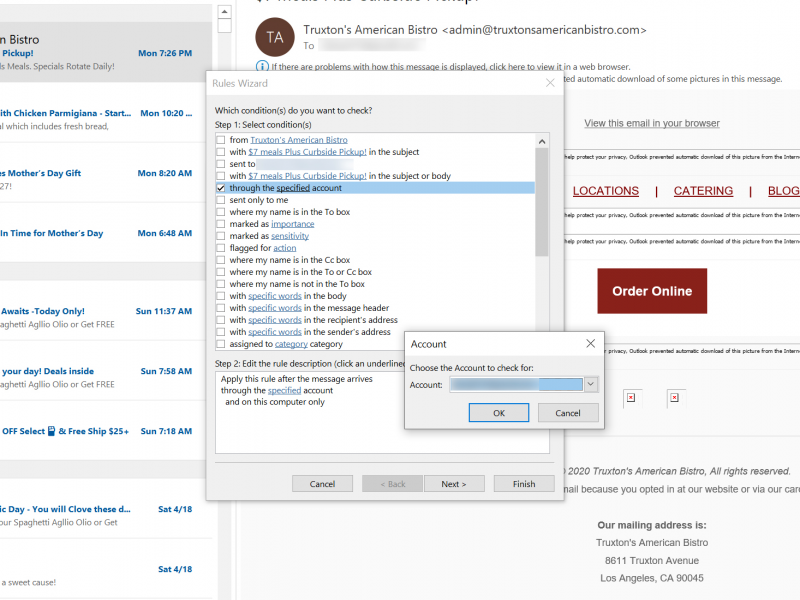
3. To use the Rules Wizard, you'll need to specify two things: What messages to act on - this is the rule's "condition" - and what to do with the message, which in this case will be forwarding it to another email account. Start by specifying the condition. If you want to forward all email that is sent to a certain email account, click the checkbox for "through the specified account." Then, in the Step 2 field at the bottom of the dialog box, click "specified" and choose the email account you want to act on.

4. You can also choose to forward email "sent only to me" (as opposed to mass mailings like newsletters) or any of the other options. You can also choose multiple conditions, so they work together - such as emails sent to a specific account that are addressed only to you.
5. When you're done, click "Next"
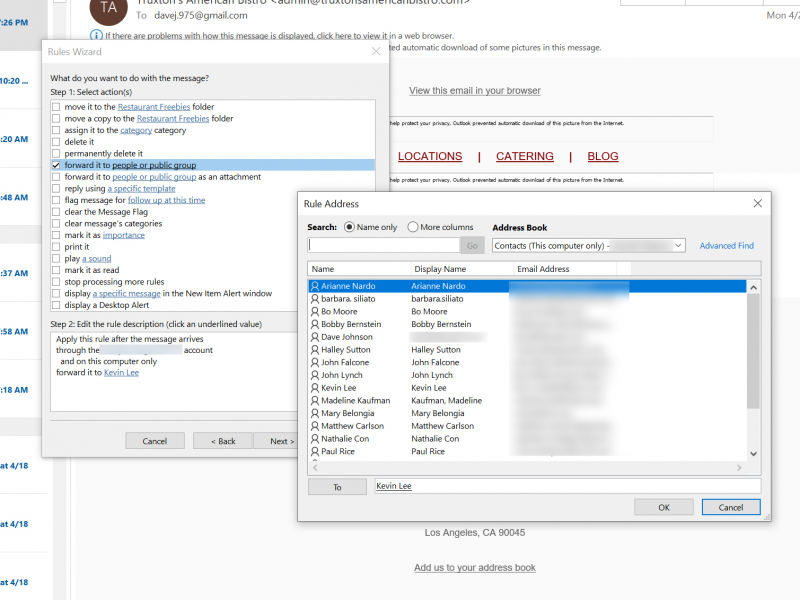
6. Click the checkbox for "forward it to people or public group." In the Step 2 field at the bottom, click "people or public group" and choose a contact from your Outlook contacts to forward the email to. Click "Next."

7. If you would like to add any exception, such as not forwarding any email with certain words in the subject line, do that on this page. You can review the lengthy list of options to see if anything applies. Click "Next."
8. To finish the rule, give it a name and then click "Finish."
Related coverage from Tech Reference:
-
How to add Zoom to your Outlook account to video conference with your contacts
-
How to set up an Outlook email account on your iPhone in the Mail app
-
How to delete your Outlook account in 2 different ways
-
How to add a signature in Microsoft Outlook in 2 different ways
-
How to use Bcc in Microsoft Outlook to send emails privately to multiple people
