Westend61/Getty Images
- There are no preset tools to curve text automatically in Canva graphic design software.
- To curve text in Canva, you’ll need to use a workaround involving shape and text tools coupled with careful placement.
- You can use your keyboard’s arrow keys to help you make more precise placements when creating your curved or circular text.
- Visit Business Insider’s Tech Reference library for more stories.
It wasn’t that long ago that the phrase “how to curve text in MS Paint” became a popular internet meme. The joke was that it was impossible. Microsoft Paint never did have the ability to curve text boxes.
But the truth is, the basic Microsoft application isn’t the only graphics app that doesn’t support curved text. Many photo editing and graphic-creation apps still can’t make a situate a row of text in a rounded shape.
Despite being way more advanced and highly popular free graphic design software, Canva is among those that lack this tool. The popular web app for creating graphics for business pages and social media posts offers no button, tool, or present to curve text.
However, there is a workaround that is perfect despite being tedious if you’re trying to do something like a circular logo.
If you frequently use Canva or are just looking to create curved text, here’s how to do it.
How to curve text in Canva
1. Open a new Canva file.
2. Create two concentric circles, making one slightly smaller than the other and each a different color.
3. Position the smaller circle precisely in the center of the larger one. The smaller circle will be centered when two perpendicular lines appear across the shape as you drag it.

Melanie Weir/Business Insider
4. Select both of these shapes by clicking outside them before dragging your mouse over the entirety of both figures.
5. Select the lock button in the top right corner of the screen to keep the circles from shifting as you complete the next step.

Melanie Weir/Business Insider
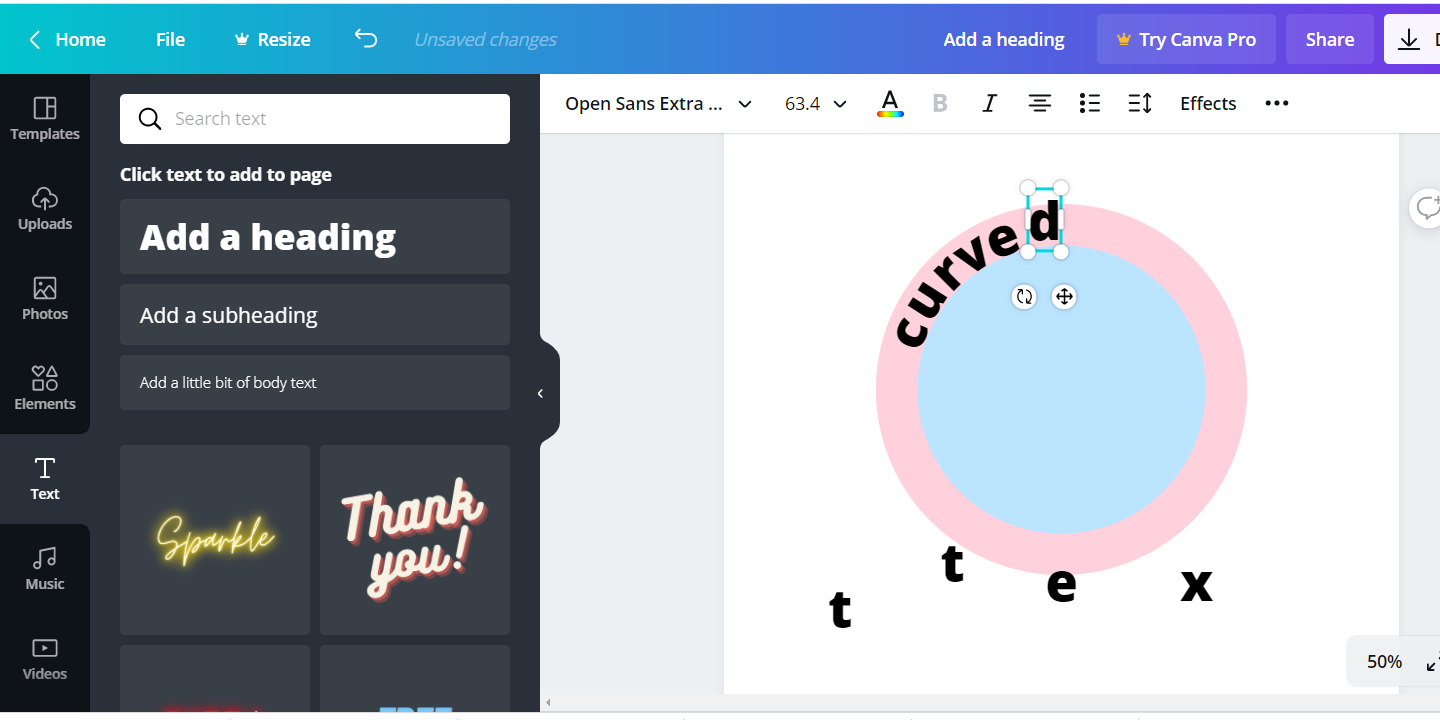
6. Create text boxes and type out each letter of the text you want to curve, making sure the text boxes themselves are just large enough for the one letter. To do this quicker, you can create the text box for the first letter, then copy and paste that box each time you need a new one preserving font presets.
7. Drag the first letter to the outside of the circle, in the space between the outer edges of each of them.
8. Use the circular arrow icon underneath each text box to rotate it until the bottom of the letter sits as level as possible on the smaller circle's outer edge. You can use the arrow keys on your keyboard to make smaller, more precise adjustments to a letter's position once you have it close to where you want it.
9. Repeat this step until all the letters are in place.

Melanie Weir/Business Insider
10. Make any necessary micro-adjustments to the spacing, curve, and placement of the letters to look as unified as possible.
11. Click and drag across the letters, the same way you did with the circles.
12. Select the three dots on the right side of the toolbar across the top of your workspace. Click "Group" to make the letters all one unit to move around the page as you please.

Melanie Weir/Business Insider
13. You can ungroup the letters at any time by pressing the same button, which changes to say "Ungroup" after you've grouped the items.
Related coverage from Tech Reference:
-
How to add text over an image in Photoshop, and adjust the font or color
-
How to invert the colors of any image in Photoshop in 3 simple steps
-
How to resize an image in Photoshop and save it for optimal use on the web
-
How to remove the background of an image in Photoshop using 2 different methods
-
How to flip an image in Photoshop to get the mirror image of any photo
