Ben Gilbert/Business Insider
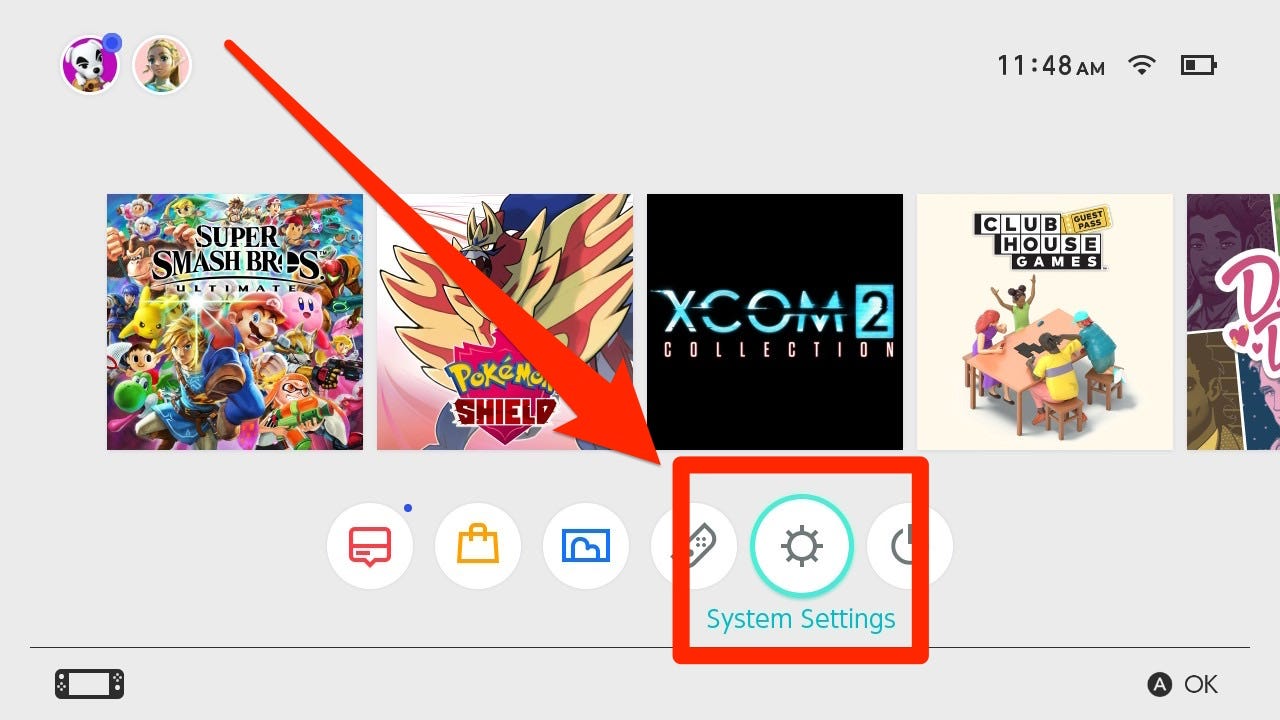
- To create a Mii on the Nintendo Switch, head to the System Settings menu.
- Miis you create can be used in certain Nintendo Switch games, such as “Mario Kart 8 Deluxe.”
- Some Switch games, such as “Super Smash Bros. Ultimate,” let you create Miis within the game itself.
- Visit Business Insider’s Tech Reference library for more stories.
If you were one of the many people that owned a Nintendo Wii, you probably remember Miis. They’re tiny, customizable characters that you can use in all sorts of games — in many ways, a precursor to today’s Bitmoji and Animoji.
Although Miis aren’t as front-and-center anymore as they were on the Wii, you can still create and save Miis on the Nintendo Switch.
Once you make a Mii, you can use it in a variety of ways, including as your user account picture, a racer in “Mario Kart 8 Deluxe,” or a fighter in “Super Smash Bros. Ultimate.” Up to 100 Miis can be saved to your system.
Here’s how to make or edit a Mii on your Nintendo Switch.
How to create a Mii on your Nintendo Switch
The quickest way to create a Mii — and the only way to edit them — is through the System Settings menu.
1. From the home screen, go to System Settings — it's the second icon from the right in the bottom toolbar.

Melanie Weir/Business Insider
2. In the System Settings sidebar, scroll down until you get to the Mii tab.
3. On the right side of the screen, go to Create/Edit a Mii and press A.

Melanie Weir/Business Insider
4. From here, you can either go through the Mii List and select a pre-existing Mii to edit, or select "Create New Mii" in the sidebar. You can also select "Send/Receive" to connect to another nearby Nintendo Switch, and send or receive Mii characters with that other console.

Melanie Weir/Business Insider
5. If you decide to create a new Mii, you'll have the option to start from scratch, choose a look-alike, or copy a Mii from an Amiibo.
If you start from scratch, you'll be given a Mii with all the default settings. If you choose a look-alike, you can instead choose a character that looks similar to you, and refine the features from there.
Choosing to copy a Mii from Amiibo requires you to own an Amiibo figurine that a Mii has been saved to.
6. Create your Mii, feature-by-feature. There are several customizable areas of the body to choose from, and you can do them in any order you'd like.

Melanie Weir/Business Insider
7. Once you choose a body area, you can use the L and R triggers to edit different aspects of that area. For example, when editing your Mii's face, you can edit the head shape first, then tab over and edit the cheeks or face lines, then choose the skin color.
When you're finished editing a given area, press the B button to go back and choose another.

Melanie Weir/Business Insider
8. You can also edit the size and placement of some of the features using a slider. The arrows next to the features indicate whether moving the slider makes the feature taller, smaller, wider, narrower, or move it up or down on the face.

Melanie Weir/Business Insider
9. You can also choose the Mii's "Favorite Color" — this chooses what color shirt they wear.
10. When you're finished, press "Done," then choose a name for your Mii to finish.
Some games, such as "Super Smash Bros. Ultimate," have their own Mii creators. These let you create and customize a Mii in the same way, but likely won't let you edit that Mii afterwards.
Miis you create through those games will be saved to the system. However, Miis you download from the internet likely won't be.
Related coverage from Tech Reference:
-
How to add a user profile to a Nintendo Switch, so that every player can have their own save files and settings
-
How to set up parental controls on your Nintendo Switch and customize or disable them
-
2 ways to fix a Nintendo Switch that won't turn on, without losing any data
-
How to charge a Nintendo Switch's Joy-Con controllers in 2 different ways
-
How to take a screenshot or video on a Nintendo Switch and view those files later
