
- The methods to change your Facebook privacy settings will vary depending on the device you're using.
- Most privacy settings are found on the Facebook website in the Settings & Privacy options.
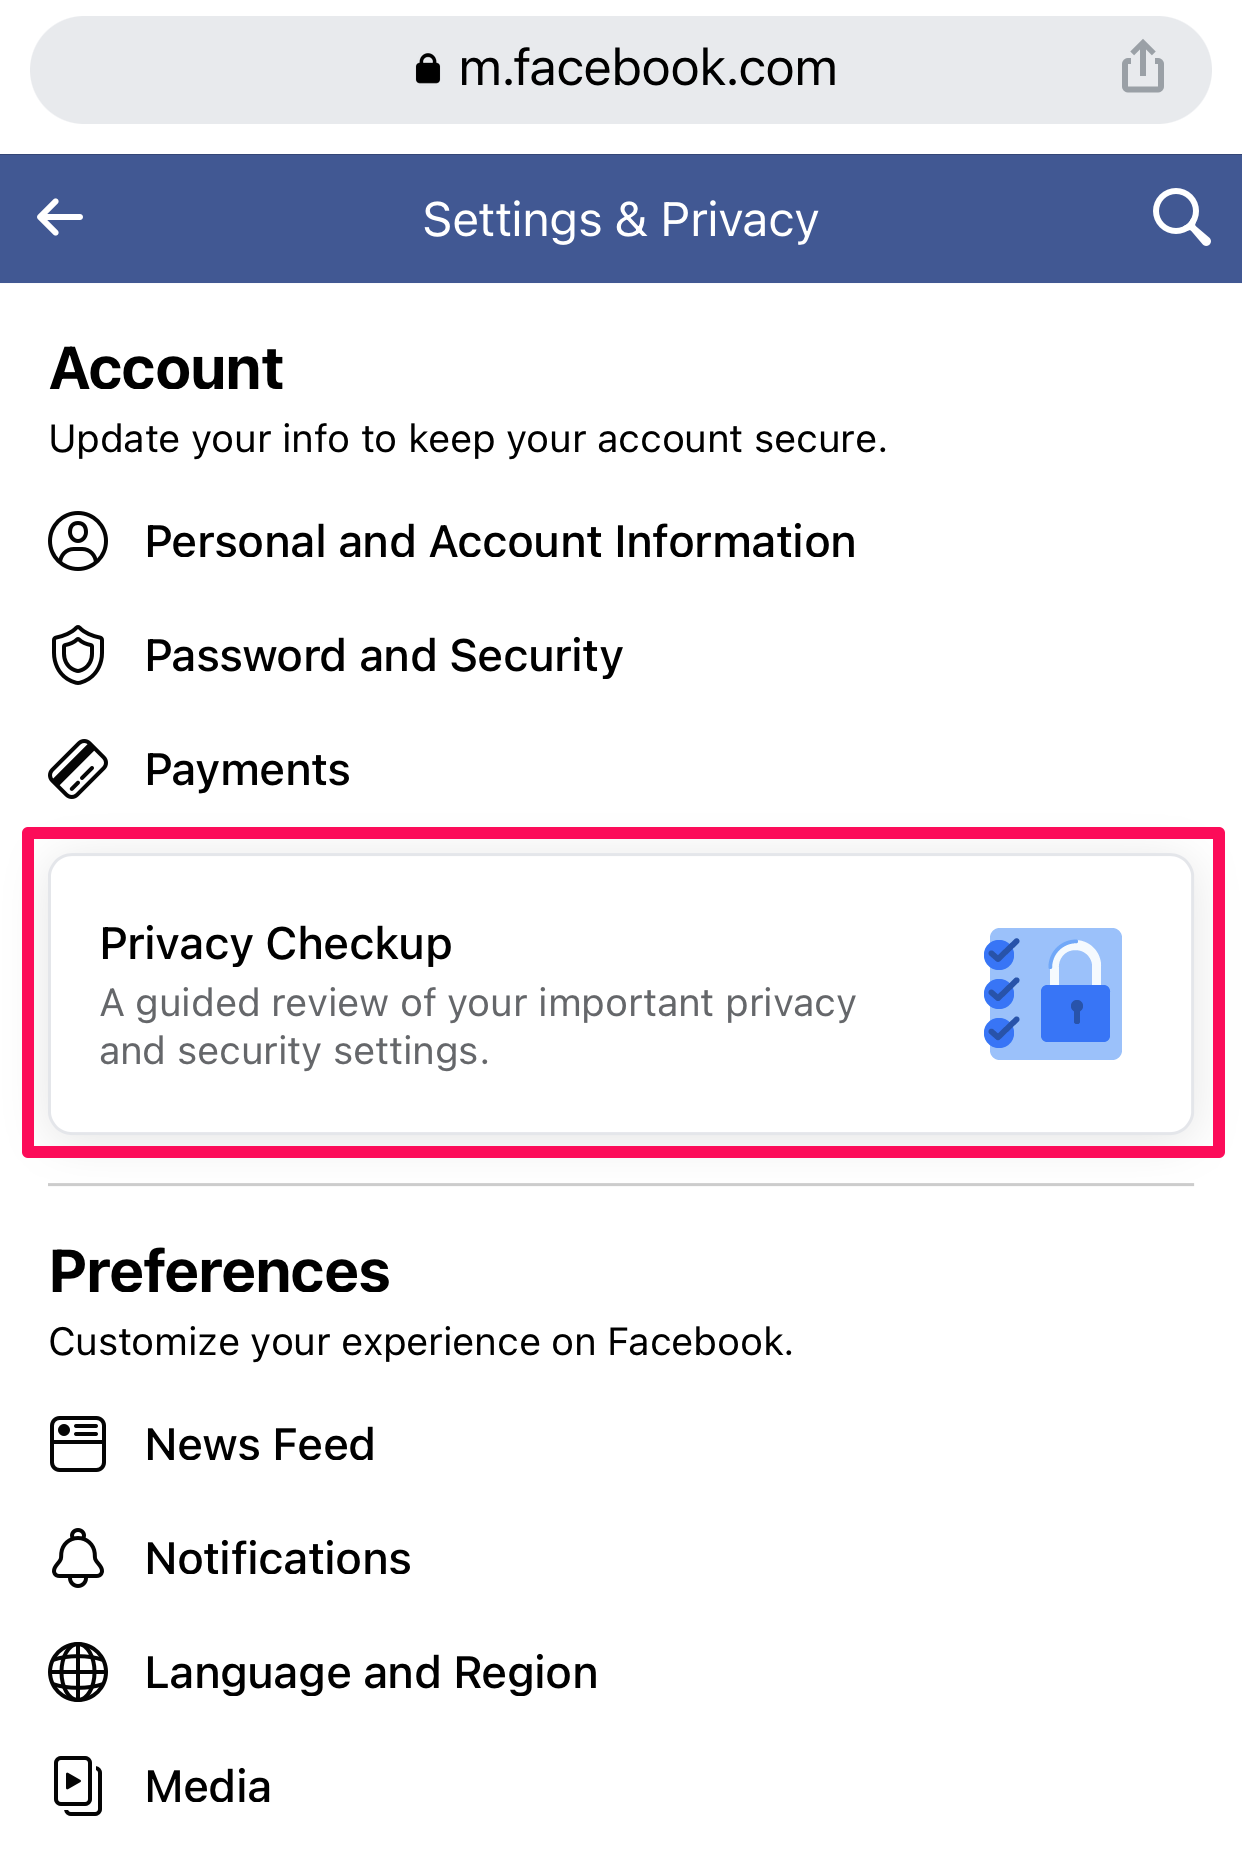
- Privacy settings on mobile devices are contained within the Privacy Checkup tool in Settings.
- Visit Insider's Tech Reference library for more stories.
Facebook doesn't have the best reputation when it comes to personal privacy, but that doesn't mean the social media platform doesn't try. Buried in Facebook's privacy settings are a wealth of options that you can tweak to improve to better protect yourself.
Before you can adjust anything, though, it's helpful to know how to find Facebook's privacy settings; those controls can feel labyrinthine at times. Here's how to get to Facebook's privacy controls and the top 10 settings you should know how to use.
How to change your Facebook privacy settings
How you get to Facebook's privacy settings depends on whether you are using Facebook in a desktop browser, mobile browser, or in a mobile app.
It's a good idea to make changes to your Facebook privacy settings in a desktop browser because Facebook has moved these settings inside a Privacy Checkup "guided review" on the mobile browser and mobile app. That makes it difficult to find and implement changes to specific settings on a mobile device unless you are willing to complete the multi-page checkup.
On a desktop browser
1. Open Facebook in a web browser on your desktop computer and log in if needed.
2. Click the downward arrow at the top right of the page to see the Account menu.
3. Click Settings & privacy.
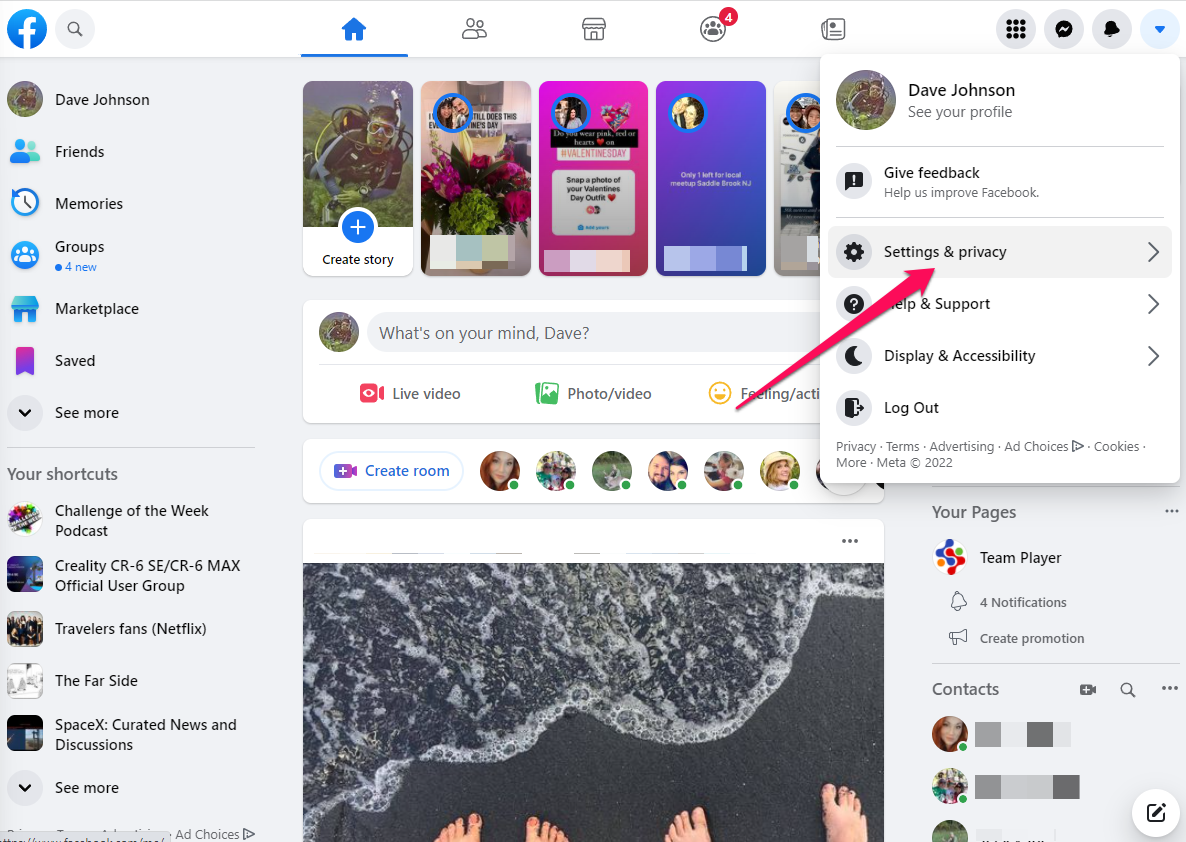
4. In the Settings & privacy menu, click Settings.
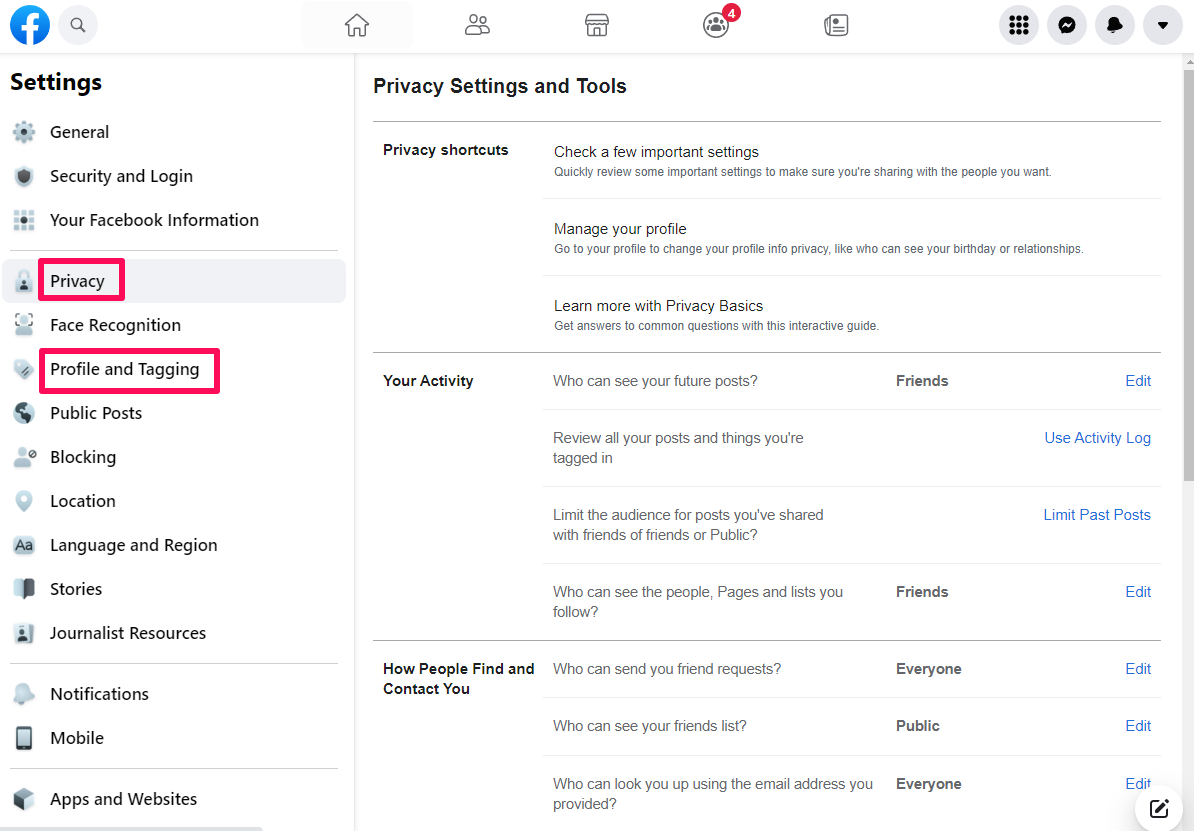
5. On the Settings page, you'll find most privacy settings in the Privacy section in the navigation menu on the left. A few additional settings can also be found in the Profile and Tagging section as well.
On a mobile browser
1. Open the Facebook webpage in a browser on your mobile device and log in if needed.
2. Tap the three-line menu at the top right.
3. Scroll down and tap Settings.
4. Tap and then complete the Privacy Checkup to find important privacy settings.
On the mobile app
1. Start the Facebook app.
2. Tap the three-line menu at the bottom right (top right on Android).
3. Scroll down and tap Settings & Privacy.
4. Tap Settings.
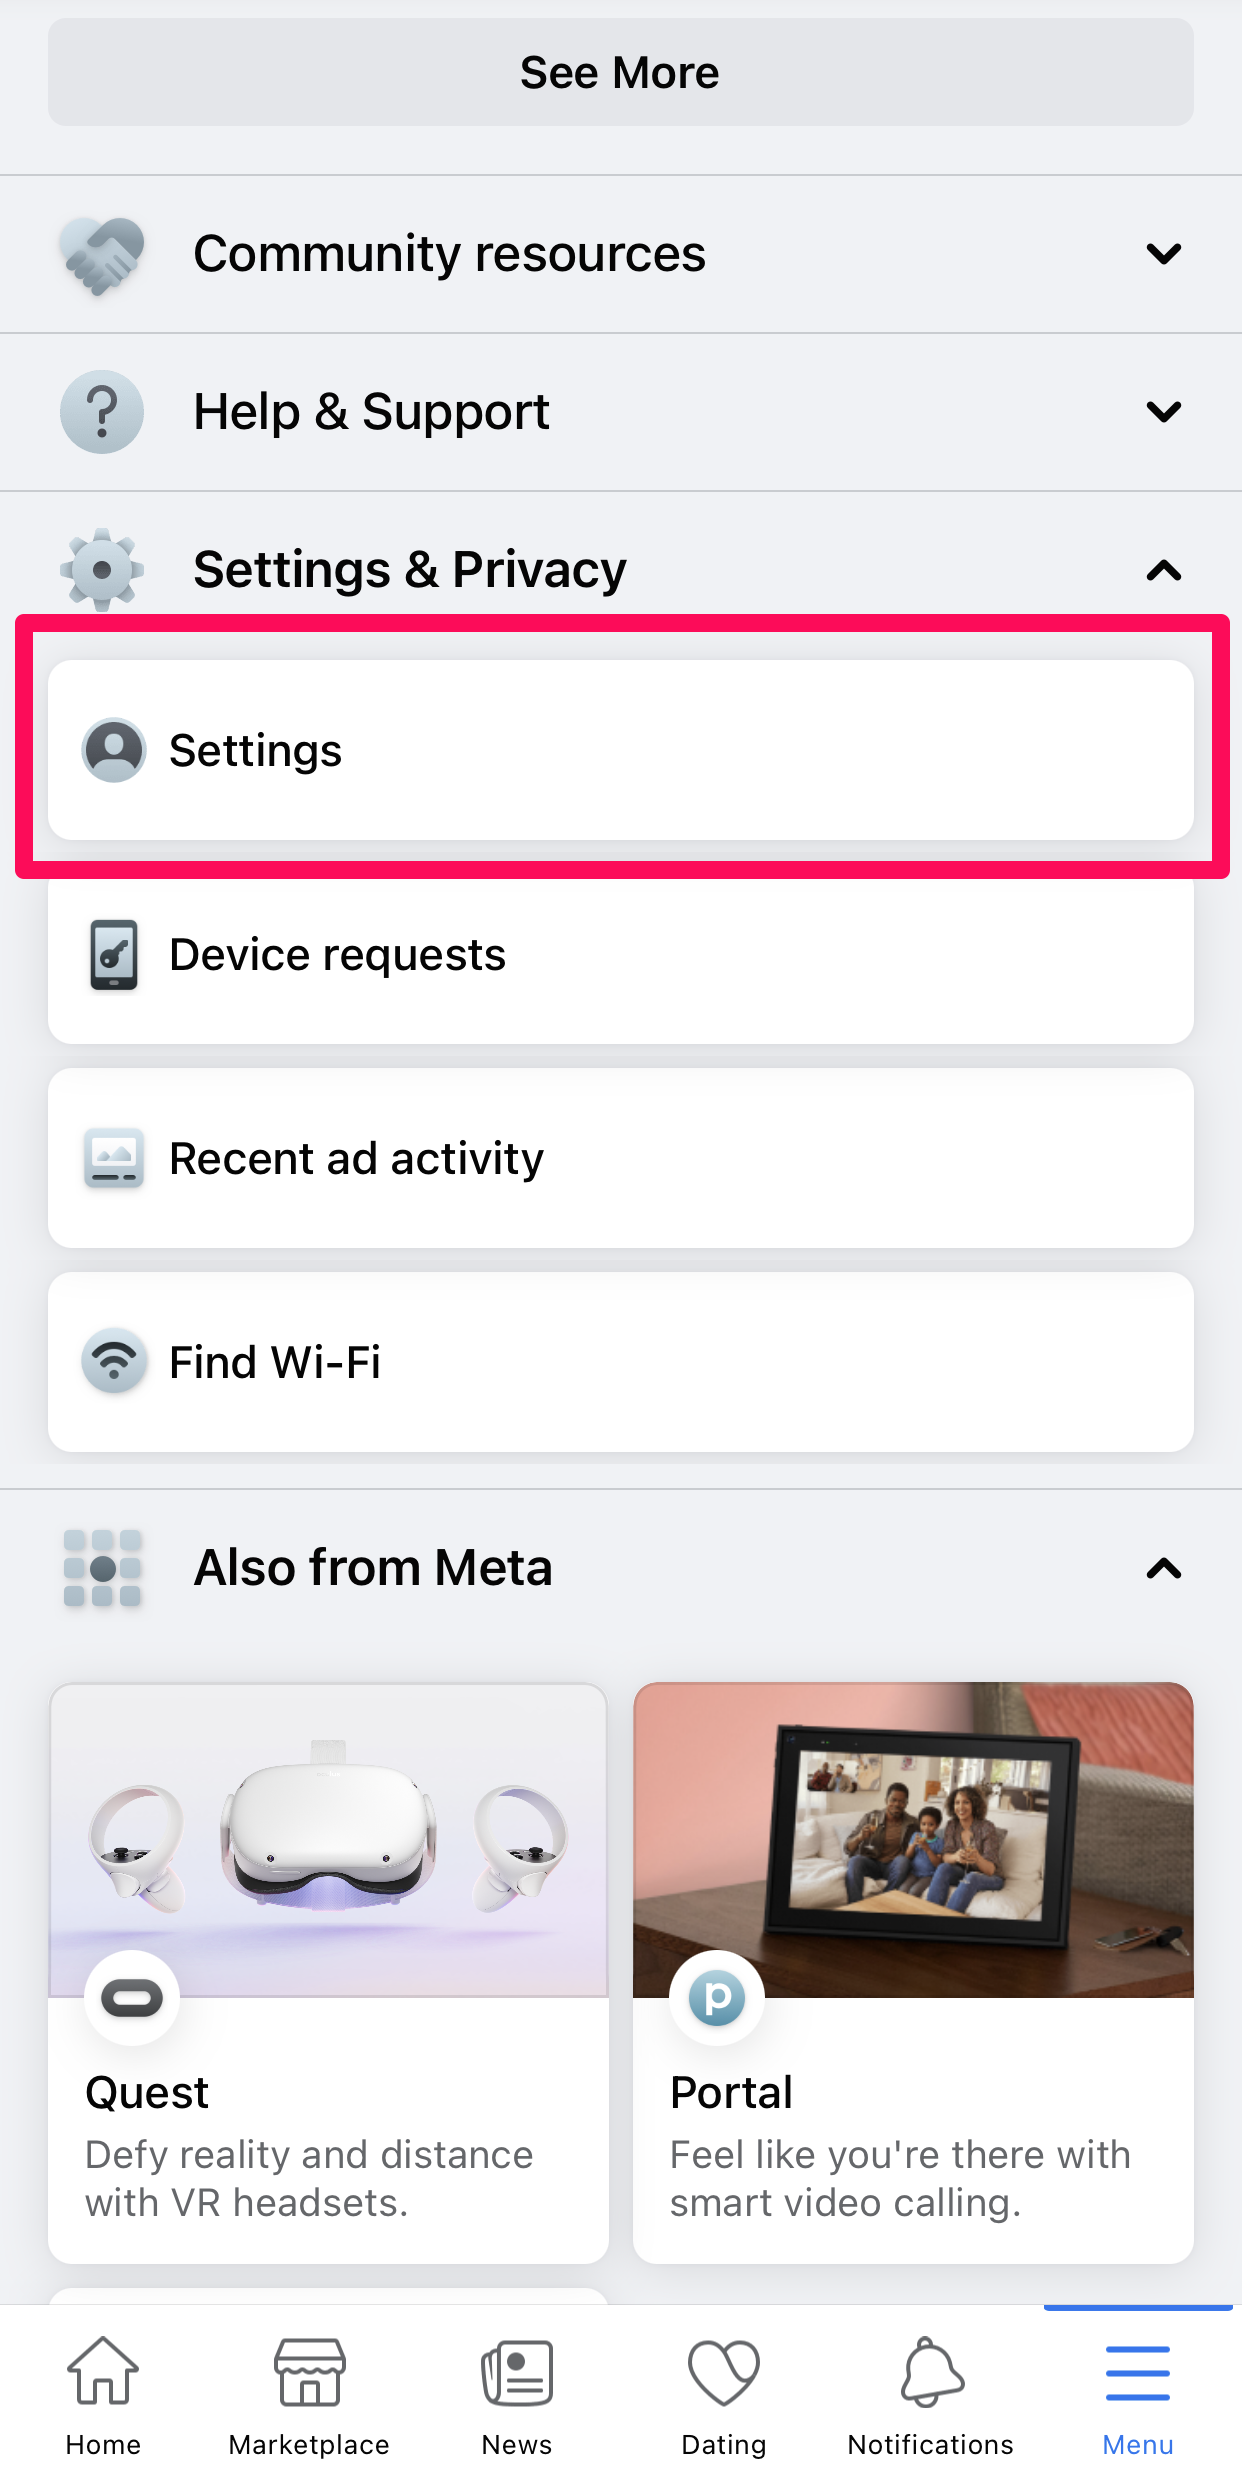
5. Tap and then complete the Privacy Checkup to find important privacy settings.
10 privacy settings to change on Facebook
Control who can see your posts
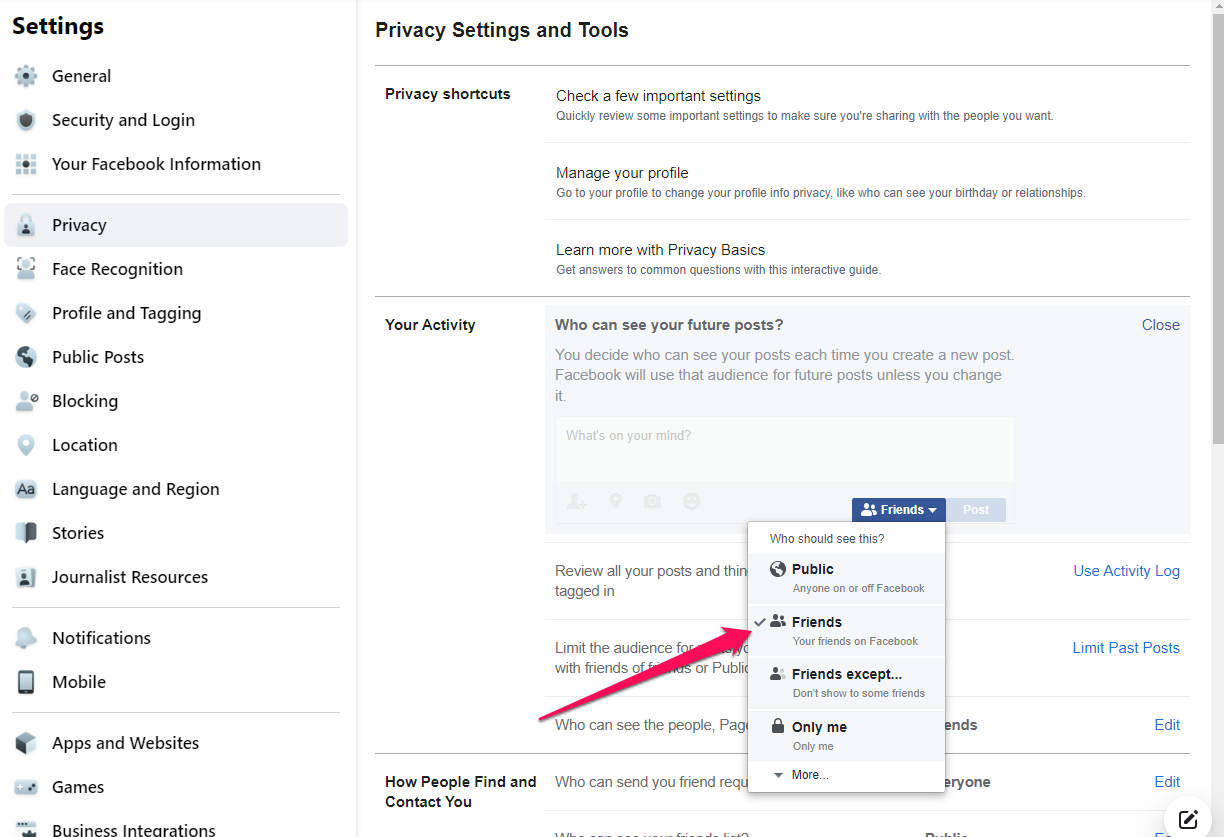
While many people publish their posts publicly, if you're concerned about your privacy, you probably prefer to post only to friends, or perhaps friends of friends. To control this, go to the browser's Settings page, then click Privacy. In the Your Activity section, find Who can see your future posts? Click Edit and change the audience as desired.
Make your friends list private
By default, your friends list can be seen by anyone who visits your profile page. To make it hidden, go to the browser's Settings page, then click Privacy. In the How People Find and Contact You section, find Who can see your friends list? and click Edit. In the drop-down menu, change it to a more restrictive audience, like Friends or Friends of Friends.
Limit the audience for your older posts
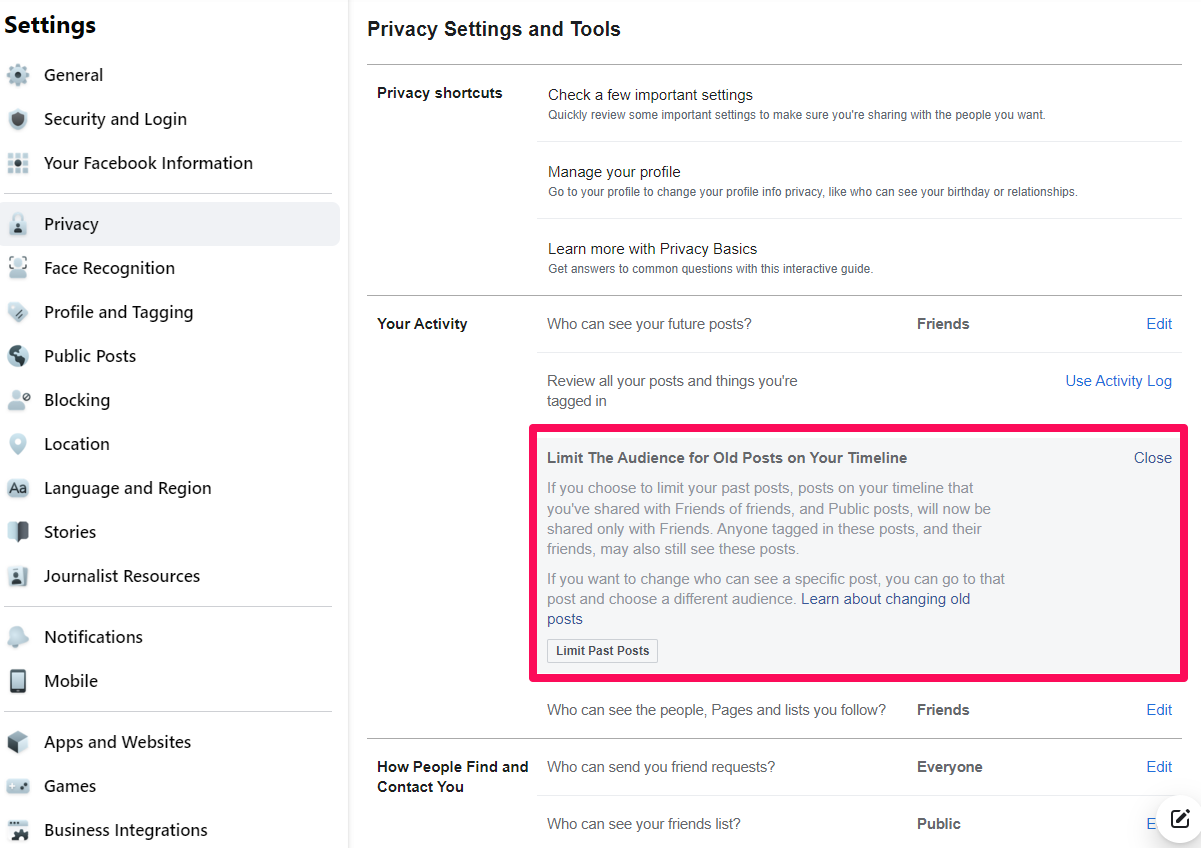
If you have older posts you'd rather not share with the world, you can quickly change the visibility of all past posts with a single click. Go to the browser's Settings page, then click Privacy. In the Your Activity section, click Limit The Audience for Old Posts on Your Timeline. Click Limit Past Posts and confirm you want to do that to set the visibility of all past posts just to Friends.
How to remove yourself from search engines
If you don't want your Facebook profile to appear in search engines like Google, you can disable this feature in Facebook. Go to the browser's Settings page, then click Privacy. In the How People Find and Contact You section, find Do you want search engines outside of Facebook to link to your profile? Click Edit and clear the checkbox. Confirm you want to make this change.
Choose who can post on your own timeline
You might not want just anyone to be able to post photos and messages on your profile's timeline. If you want to be the only person who can post, go to the browser's Settings page and then click Profile and Tagging. In the Profile section, find Who can post on your profile and click Friends. Change it to Only me.
Require approval before posts you're tagged in appear on your profile
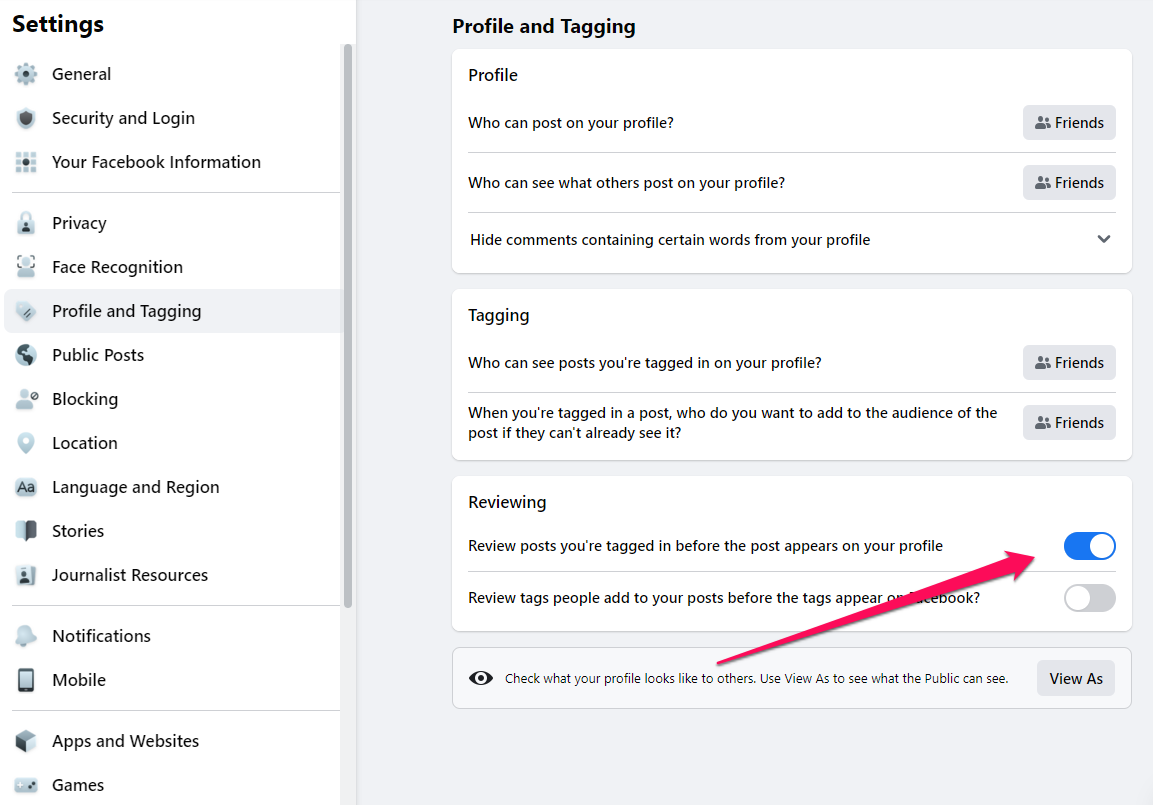
Want to manually approve any post you're tagged in before it appears on your profile? Go to the browser's Settings and then click Profile and Tagging. In the Reviewing section, turn on Review posts you're tagged in before the post appears on your profile by swiping the button to the right.
Don't let people find you via your phone number or email
If someone knows your phone number or email address, Facebook will let that person search for you with that info. You can disable this intrusive search feature. Go to the browser's Settings page, then click Privacy. In the How People Find and Contact You section, find Who can find you using the email address you provided? Click Edit and change the result from Everyone to something more restrictive. You can do the same with Who can look you up using the phone number you provided?
Cut off permission for games and apps
In a more innocent time, you might have logged into games, apps, and websites via Facebook and shared a lot of personal information. It's time to clean house. Go to the browser's Settings page and then click Apps and Websites. For any entries you no longer want to use, click Remove. If you want to stay connected to any apps, click View and Edit and then Remove any permissions you currently allow — like your Friends list, for example.
Block a user
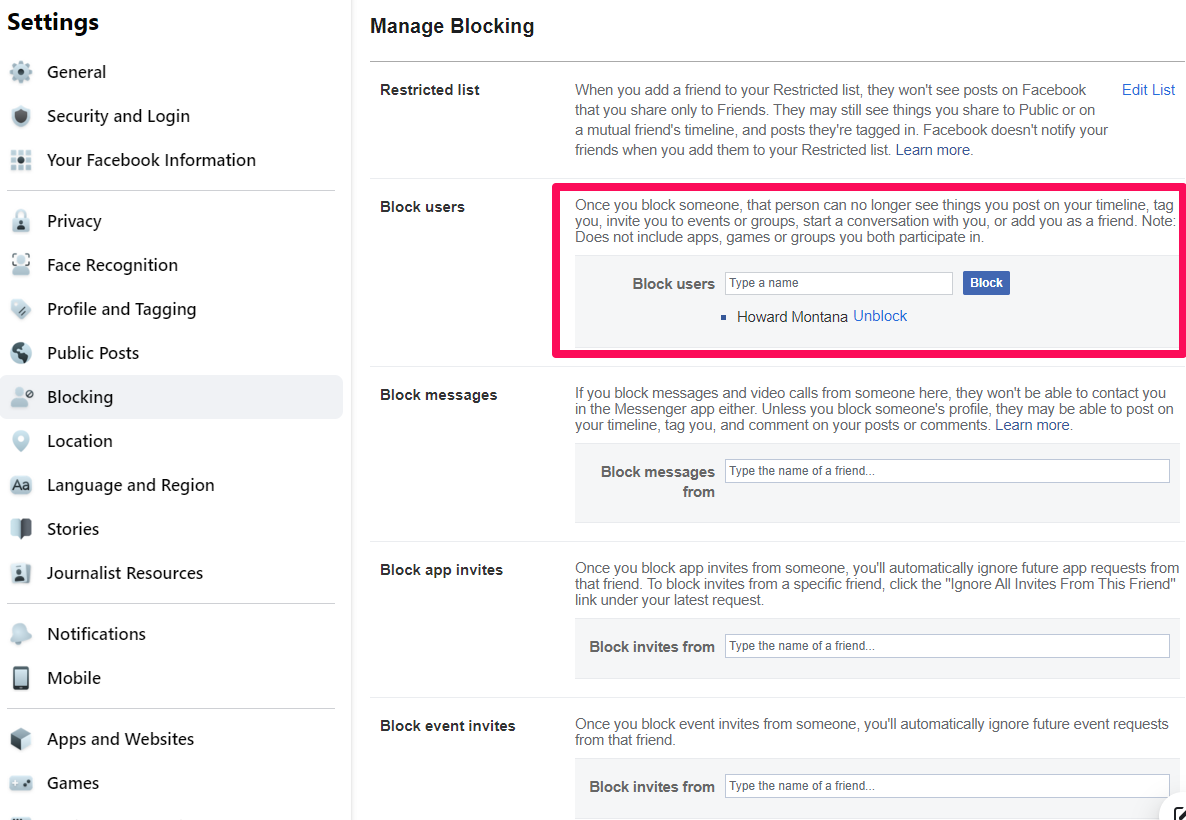
You can prevent specific users from interacting with your profile or posts. Go to the browser's Settings page and then click Blocking. In the Block users section, type the person's name and then click Block. You'll see a list of possible users; find the problematic user and click Block.
See your profile the way others see you
Finally, it's a good idea to inspect your profile through the eyes of a stranger — is there anything private or embarrassing available to the public? In a web browser, open Facebook and go to your profile page. Click the three-dot menu on the right, beneath Edit profile, and choose View As. You can now see the page the way a public user sees it. When you're done, click Exit View As at the top right.

